This chapter contains the following topics:
Preparing to Start a Checkbook
Setting Up Check Reconciliation
Starting a checkbook is a task that can be done only when the PBS Check Reconciliation (C/R) module is in start-up mode (as defined in the Control information Start-up mode or regular use field).
For any cash account and its corresponding checkbook, one of several situations can occur:
| • | One or more of the Accounts Payable, Accounts Receivable, and Payroll PBS modules has already been in use, and the Check Reconciliation module is being added. |
| • | You may want to start interfacing from an external source such as NCR Counterpoint. |
| • | No other module has been in use yet. |
| • | The Check Reconciliation module and one or both of the Accounts Payable and Payroll modules are already in use, and the Accounts Receivable module is to be newly installed. |
| • | You have just installed the Check Reconciliation module, and you are using no other PBS modules. (The sample information used in examples in this user documentation is based on this assumption.) |
A checklist for each of these situations is located at the end of this chapter. Passport suggests that you use the one from this user documentation most applicable to your situation and check off the steps as you perform them. The checklist steps guide you through the correct sequence of actions to set up your checking accounts.
If you are adding a checkbook, which already has activity (not as a result of using Accounts Receivable, Accounts Payable, or Payroll) follow Checklist B. If you are adding an entirely new checkbook, which has no activity, it is not necessary to go into start-up mode or use Checklist B. Follow the steps below:
|
Step |
Description |
|
0 |
If you have never used PBS before, you must enter Company information, Cost centers / sub accounts (if used) and Valid G/L accounts. These may be entered under the CTL menu. Otherwise you may skip this step. |
|
1 |
Add the new cash account using the Cash accounts menu selection found under CTL. This may have already been done if you set up other modules before Check Reconciliation. |
|
2 |
Add the checking account using the Check Reconciliation Checking accounts menu selection. |
|
3 |
If you are using ACH direct deposit in Accounts Payable or Payroll, from the CTL - Banks menu selection add a system bank record. |
|
4 |
In Accounts Receivable enter a Bank account. Make the cash account the default in the Accounts Receivable, Accounts Payable, or Payroll Control information, as applicable. In Payroll Control information set up your ACH direct deposit account. Then go on with your regular day-to-day processing. |
|
Note |
Use the Set-up: clear entries feature only if you are using at least one other PBS module and you wish to transfer your historical data into the C/R checkbook. For when to use it, see Checklist A-2. If you do not want to transfer all your historical checks and deposits into the checkbook, see Checklist A-1. |
In your regular day-to-day use of this module (not in start-up mode), you never purge checkbook entries from the Checkbook. Instead, you compress groups of cleared checks and deposits into what are called balance forward entries. In this way, your checkbook balance is always correct.
However, when you are in start-up mode, you are allowed to purge checkbook entries at will, as well as enter or change them. This feature allows you to set up your checkbook quickly, simply, and directly.
Once you leave start-up mode and go into regular use mode (by running Set-up: set last balance), you are no longer allowed to purge checkbook entries.
Select
Set-up: clear entries from the Utility menu.
Use this feature to mark entries that you want to purge. When you purge an entry, you completely remove it.
A screen displays for you to enter the account number of the checking account to clear.
Options
Enter the checking account (using the Checking accounts menu selection), or use one of the following options:
|
<F1> |
For the next checking account |
|
<SF1> |
For the previous checking account |
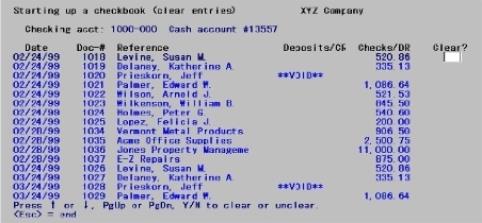
Regardless of the option you choose, after entering a checking account, a screen like this displays:
Select entries to clear pressing the <Up> and <Down> keys. Move forward to the next screen of entries by pressing <PgDn>. Move back to the previous screen of entries by pressing <PgUp>.
Clear ?
To clear an entry so that it can be purged, enter Y in the Clear? column. To exclude an entry from purging, skip it by pressing <Up> or <Down>. If you have already entered Y for an entry and want to change the it, just enter N in the Clear? column.
When finished select the <Esc> key to return to the menu.
For when to use Purge entries, see Checklist A-2.
To purge entries after selecting them, follow the instructions below.
Select
Set-up: purge entries from the Utility menu.
Options
On the screen that is displayed, enter the account number of the checking account to clear. Enter the checking account (account must be in Checking Accounts), or use one of the following options:
|
<F1> |
For the next checking account |
|
<SF1> |
For the previous checking account |
When you run Purge entries, any entries marked as cleared for purging are purged. The processing occurs automatically.
Setting the last balance is used as a step in Checklist A-1 and Checklist A-2.
Use the Set-up: set last balance selection to set the last statement balances and dates for all checking accounts and leave start-up mode. You should run this when you are satisfied that all of your checking accounts are properly set up.
If you have cleared entries for purging, but have not yet purged them, you will get an error message, and will not be able to continue with this selection until you have either purged the cleared entries or “uncleared” them. It may be necessary to do this for more than one checking account.
Select
Set-up: set last balance from the Utility menu.
After setting the last statement balances and dates for all checking accounts, a screen displays the message below if all of the information is correct:
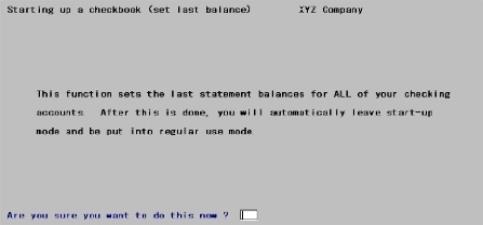
If you continue, the last statement balance for each checking account is then set to the balance of all entries in the account, and the last statement date is set to the latest clear date on any entry.
The Check Reconciliation module is then changed from start-up mode to regular use mode automatically.
Use Checklist A-1 when one or more of the Accounts Payable, Accounts Receivable, and Payroll modules has already been in use, Check Reconciliation is being added and you do not want to retain early historical checks and deposits from A/P, A/R and Payroll.
Potentially you may have thousands of checks and deposits from earlier work. This checklist relieves you of the effort of manually clearing all these historical records. If you prefer to keep all your historical data in the C/R Checkbook use Checklist A-2.
You may need to reference the following user documentation:
| • | Getting Started |
| • | Transfer Checks/Deposits |
| • | Checkbook Entries |
| • | Starting Up a Checkbook (this chapter) |
| • | Cash History chapter in the Accounts Receivable user documentation (Deposits section) |
| • | Control Information chapter in the Accounts Payable user documentation |
Follow steps 1 through 8 for each of your cash accounts.
|
Step |
Description |
|||||||||
|
1 |
Make sure that you have done the following:
|
|||||||||
|
2 |
Transfer all checks and deposits from the other existing PBS modules to the Checkbook, using Transfer Checks/Deposits, according to whether you are using Accounts Receivable, Payroll, or Accounts Payable. You may use "Latest" for the cut-off transfer date. You may also use the date of your last statement and transfer the more recent checks and deposits after you are finished with Start-up mode. This is done in step 8.
You will be asked the question Mark checks/deposits as transferred ONLY (No transfer)?. Select Yes and checks and deposits will be marked as transferred. However, they will not be transferred to the C/R Checkbook. Selecting Yes will relieve you of the efforts of having the clear ALL historical checks and deposits. Note that the last transfer date is not updated when you use this option.
The method you use to transfer checks and deposits depends on the module you are using and your Control information settings. Refer to the Selecting the Transfer Method for Step 2 section below this table detailed instructions. |
|||||||||
|
3 |
Using Load Checkbook, enter any other outstanding checks and deposits that were not transferred and have not yet appeared on your bank statement. See Load Checkbook for details. (These would be outstanding checks and deposits that were no longer in History when you did the transfer above.) There might not be any of these.
At this point, the Checkbook contains only entries that have not cleared the bank yet, as of the date of the last bank statement. It should contain all of these entries at least up to the closing date of the last bank statement. It might also contain entries after the last statement date. |
|||||||||
|
4 |
Go back to Load checkbook and enter a Balance forward amount. The amount is the closing amount of your last bank statement. You should have already reconciled this statement manually. If this has not yet been done, you can make any adjustments and corrections later through Checkbook entries or Load checkbook. The date of the balance forward entry should be the closing date of the last bank statement. |
|||||||||
|
5 |
Repeat Steps 1 through 4 for each of your cash accounts. |
|||||||||
|
6 |
Run Set-up: set last balance. Your checkbooks are now set up for regular use and you are no longer in start-up mode. |
|||||||||
|
7 |
If you are using the auto-transfer feature, switch this on in Check Reconciliation Control information for the modules you wish to automatically transfer checks and deposits. |
|||||||||
|
8 |
If you used "Latest" for the cut-off transfer date in step 2 you can ignore this step. If you are using the auto-transfer feature, you must run Transfer checks/deposits to transfer any checks or deposits since the transfer date used in step 2. Future checks and deposits will be transferred automatically. If you are not using auto-transfer your checks and deposits will be pulled in the next time you run Transfer checks/deposits. |
|
Note |
If you have any uncleared entries dated before the balance forward entry you entered above, the running balance figure will not be accurate prior to the balance forward entry; however, it will be accurate from the balance forward entry onward. Once all entries before the date of the last bank statement have finally been cleared, the running balance figure will be accurate in all cases. |
Selecting the appropriate transfer method for Step 2 in the table above depends on whether you are using Accounts Receivable, Payroll, or Accounts Payable and if you are using the automatic or manual transfer method. Follow the instructions for the appropriate module below to complete Step 2 from the above table. When you are finished with this step go back to step 3 in the table above.
If You are Using Accounts Receivable
Depending on the Check Reconciliation Control information settings you may transfer cash receipts one of two methods:
| 1. | Transfer cash receipts to the Check Reconciliation module using Transfer checks/deposits after gathering all cash receipts into deposit slips. |
| 2. | Automatically transfer deposits when printing the deposit slip. |
When Check Reconciliation is in start-up mode, you do not have to print deposit slips before transferring cash receipts. Later, during regular use of the Check Reconciliation module, any cash receipt will have to be printed on a deposit slip before it can be transferred. If needed, refer to Preparing deposits in the Deposit slips chapter from the Accounts Receivable user documentation.
Transfer these cash receipts, using Transfer checks/deposits. All deposits in Cash History, regardless of the deposit slip being printed or not, will be marked as transferred. If you print the deposit slip and you are set up for the automatic transfer, the deposit is transferred. To avoid confusion you may not want to set up for automatic transfer until you go into regular mode.
If You are Using Payroll
Depending on the Check Reconciliation Control information settings you may transfer checks and direct deposit payments one of two methods:
| 1. | Transfer checks and payments to the Check Reconciliation module using Transfer checks/deposits after gathering all printing checks and payments. |
| 2. | Automatically transfer pay and voids when posting checks, payments and voids. |
Regardless of the transfer method, transfer all existing payroll checks using Transfer checks/deposits. All checks and direct deposit payments in Payroll History will be marked as transferred. When you are in setup mode, if you are set up for automatic transfer, only new checks and payments are transferred when posting. To avoid confusion you may not want to set up for automatic transfer until you go into regular mode.
If You are Using Accounts Payable
Look at your answer as it currently exists for field Keep vendor history in the Accounts Payable Control information. Based on your current setting:
| • | If your current answer is checked (Y for yes in character mode) transfer all checks using Transfer checks/deposits. All checks in Vendor History will be marked as transferred. |
| • | If your current answer is no (N) or unchecked, there are no checks in Vendor History to transfer. |
| • | Change your answer to checked (Y), so that the Accounts Payable system will hold future A/P checks for transfer to Check Reconciliation. Since no Accounts Payable checks have been transferred, skip steps 3 and 4, and go directly to Step 5. |
Depending on the Check Reconciliation Control information settings you may transfer checks and direct deposit payments one of two methods:
| 1. | Transfer checks and direct deposit payments to the Check Reconciliation module using Transfer checks/deposits after gathering all printing checks and payments. |
| 2. | Automatically transfer pay and voids when posting checks, payments and voids. |
Regardless of the transfer method, transfer all existing accounts payable checks using Transfer checks/deposits. All checks and direct deposit payments in Vendor History will be marked as transferred. When you are in setup mode, if you are set up for automatic transfer, only new checks and payments are transferred when posting. To avoid confusion you may not want to set up for automatic transfer until you go into regular mode.
Use Checklist A-2 when one or more of the Accounts Payable, Accounts Receivable, and Payroll modules has already been in use, Check Reconciliation is being added and you want to retain all the earlier data from A/P, A/R and Payroll.
You may need to reference the following user documentation:
| • | Transfer Checks/Deposits |
| • | Checkbook Entries |
| • | Starting Up a Checkbook (this chapter) |
| • | Cash History chapter in the Accounts Receivable user documentation (Deposits section) |
| • | Control Information chapter in the Accounts Payable user documentation |
Follow steps 1 through 9 for each of your cash accounts.
|
Step |
Description |
|||||||||
|
1 |
Make sure that you have done the following:
|
|||||||||
|
2 |
Transfer all checks and deposits from the other existing PBS modules to the Checkbook, using Transfer Checks/Deposits, according to whether you are using Accounts Receivable, Payroll, or Accounts Payable. Use "Latest" for the cut-off transfer date.
You will be asked the question "Mark checks/deposits as transferred ONLY (No transfer)?. Select No and all your checks and deposits will be transferred to the C/R Checkbook. In steps 3 and 4 you must clear ALL check historical checks and deposits that were transferred.
The method you use to transfer checks and deposits depends on the module you are using and Control information settings. Refer to the Selecting the Transfer Method for Step 2 section above this table for instructions on the module you are using. |
|||||||||
|
3 |
Run Set-up: clear entries, and clear all entries that are on your latest bank statement, and then purge these entries using Set-up: purge entries. |
|||||||||
|
4 |
Using Set-up: clear entries, clear all entries earlier than the current bank statement, except for the entries that have not cleared the bank yet. Then purge all cleared entries. The result is a Checkbook that contains all checks and deposits previously entered through Accounts Payable, Payroll, and Accounts Receivable that have not appeared yet on any bank statement (have not cleared). |
|||||||||
|
5 |
Using Load Checkbook, enter any other outstanding checks and deposits that were not transferred and have not yet appeared on your bank statement. See Load Checkbook for details. (These would be outstanding checks and deposits that were no longer in History when you did the transfer above.) There might not be any of these.
At this point, the Checkbook contains only entries that have not cleared the bank yet, as of the date of the last bank statement. It should contain all of these entries at least up to the closing date of the last bank statement. It might also contain entries after the last statement date. |
|||||||||
|
6 |
Go back to Load checkbook and enter a Balance forward amount. This amount is the closing amount of your last bank statement. The date of the balance forward entry should be the closing date of the last bank statement.
You should have already reconciled this statement manually. If this has not yet been done, you can make any adjustments and corrections later through Checkbook entries or Load checkbook. Keep in mind that Checkbook entries create distributions that get pulled to G/L when running Get distributions where Load checkbook entries do not. |
|||||||||
|
7 |
Repeat Steps 1 through 6 for each of your cash accounts. |
|||||||||
|
8 |
Run Set-up: set last balance. Your checkbooks are now set up for regular use and you are no longer in start-up mode. |
|||||||||
|
9 |
If you are using the auto-transfer feature, turn this on in Check Reconciliation Control information for the modules you wish to automatically transfer checks and deposits. |
|
Note |
If you have any uncleared entries dated before the balance forward entry you entered above, the running balance figure will not be accurate prior to the balance forward entry; however, it will be accurate from the balance forward entry onward. Once all entries before the date of the last bank statement have finally been cleared, the running balance figure will be accurate in all cases. |
Use Checklist B when no other PBS module has been in use yet.
You may need to reference the following user documentation chapters:
| • | Control Information |
| • | Checkbook Entries |
| • | Starting Up a Checkbook |
If you are going to be using any other PBS modules, install them first and build the control and master data for each module before starting this Check Reconciliation module.
Follow Steps 1 through 5 to complete the transferal:
|
Step |
Description |
|
1 |
Make sure that you have entered a checking account (using Checking accounts) for each cash account used by Accounts Payable, Accounts Receivable, and Payroll (if one or more of these modules is in use). Make sure that you have entered a cash account (using Cash accounts) and a checking account (using Checking accounts) for any other checking accounts to be maintained by Check Reconciliation, and which are not used by other PBS modules. |
|
2 |
Make sure that start-up mode is selected in C/R Control information. |
|
3 |
Take the latest bank statement dated before any checks or deposits are entered into the other PBS modules, and enter a balance forward entry, using Load Checkbook. The date and amount of this entry are the date and closing balance of the last bank statement. |
|
4 |
Using Load Checkbook, enter all checks and deposits that have not yet been cleared as of the latest bank statement directly into the Check Reconciliation module. These will be checks and deposits that you will not be entering into the other modules. The result is Checkbook data that has only outstanding entries for each checking account, as of the date of the latest bank statement, and has all of these outstanding entries. |
|
5 |
Run Set-up: Set last balance. |
Use Checklist C when:
| • | The Check Reconciliation module is in use. |
| • | One or both of the Accounts Payable and Payroll modules are already in use. |
| • | The Accounts Receivable module is to be newly installed. |
You may need to reference the following user documentation chapters:
| • | Control Information |
| • | Checkbook Entries |
| • | Starting Up a Checkbook (this chapter) |
You have been entering deposits, up until now, directly into the Check Reconciliation module, and some Accounts Receivable deposits already exist. Some might be marked as cleared already, and some might not yet be marked as cleared.
Follow the steps below for Checklist C:
|
Step |
Description |
|
1 |
Install and configure the Accounts Receivable module, using the PBS Administration documentation and Accounts Receivable user documentation as references. |
|
2 |
In C/R Control information set it so that you are interfaced to Accounts Receivable. You may also elect to auto-transfer deposits from A/R and show deposit detail. |
|
3 |
Start entering cash through the Accounts Receivable module. |
|
4 |
Discontinue entering deposits directly through the Check Reconciliation module. That is all you need to do. The balance forward in the Reconciliation module will already be correct. |
Use Checklist D when you have just installed the Check Reconciliation module, and you are not using other PBS modules.
You may need to reference the following user documentation chapters:
| • | Checkbook Entries |
| • | Starting Up a Checkbook (this chapter) |
Follow the steps below for Checklist D:
|
Step |
Description |
|
1 |
Make sure that you have entered a cash account, (using Cash accounts) and a checking account, (using Checking accounts) for each checking account to be maintained by Check Reconciliation. Make sure that start-up mode is selected in C/R Control information. |
|
2 |
Using Load Checkbook, enter a balance forward entry with the date and closing amount of the last bank statement. Read more about this function in the Load Checkbook chapter. |
|
3 |
Using Load Checkbook, enter all checks, deposits, and adjustments that have not yet cleared the bank as of the last bank statement. |
|
4 |
Run Set-up: set last balance. |
You are now be ready to use the Check Reconciliation module for regular day-to-day processing.